Eddie Trimarchi 24-12-97
Originally a shortage of articles for Quasar (the Southern Astronomical Society
newsletter), prompted me to write this pictorial and short story about Freespace observatory and its making. Since then Freespace observatory has gone through many changes, some cosmetic and some functional. Since first posting this page, I've been contacted on many ocassions by people planning to build similar designs.Background
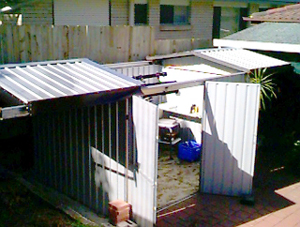
The Tin Shed Observatory started life as a standard 2.5 x 3.0 metre Zincalume garden shed originally erected to house a 14" Dobsonian telescope. This telescope was mounted on castors to allow wheeling the scope in and out of the shed. A forty square metre area was paved with cement paving bricks. A slight slope was created with the shed on top, for drainage.
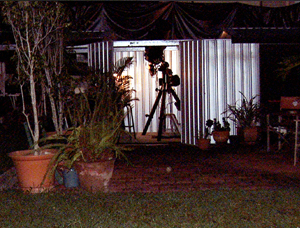
After building a Cookbook ccd camera, the CB245 I got more interested in ccd imaging than visual observing and moved to an SP-C8. After a few months I got tired with carrying the fully loaded C8 through two doors and around several tight bends to get it to my regular set up spot marked on the pavers. Even more tiring was having to do an accurate polar alignment every night. Cooling the camera can take over 20 minutes and total setup was taking up to 2 hours, and on a school night I only had this long in total for the night before bedtime. Astroshed Observatory was created so as to rid myself of much of the inconvenience and spend more time with the rest of the learning curve. (It also taught me a lot about my neighbours, but that's another story)
With the help of my good friend Mick Wolny, a master craftsman who loves doing new things, and some good ideas gleaned from Kevin Dixons (SAS) observatory we analysed our requirements to try and determine how best to go about this.
The original idea was...
The roof would be cut in half at the middle along the minor axis.
Four wheels would be attached to each section of the roof making the two sections moveable independently of each other, in either direction.
Both sections of the roof would be padlocked into place when closed.
The pier mounting would be bolted to a concrete slab.
The rest, we made up as we went along.
The Roof
The roof was originally mounted to the walls with pop rivets. These were easily removed with an electric drill, and the roof removed. It was surprising just how flimsy the roof was once removed and it was immediately obvious that structural reinforcement would be necessary. For this we decided on 50x50x3mm angle iron for the roof trusses. Also for structural integrity, 3mm steel plate was used for the wheel brackets, which were welded directly to the roof supports.
 |
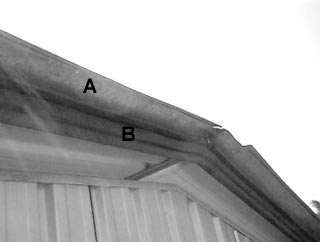
The wheel brackets and roof trusses of the innermost roof sections with the roof closed. One of the three roof padlocks is also shown. |
All steel was cut to size on site but we did not have any welding facilities. Remembering an advertisement from television where a small hand walks around looking for things, Mick found a mobile welder in the yellow pages that actually made house calls. He came over and welded the lot for $50, took about two hours and did a great job.
As with most roll-off roof observatories, a track was required for the wheels to roll in, and guide the roof sections when moving them. C-Purlin is often used for this purpose and come in standard lengths of six metres, which is perfect for a 3-metre shed, allowing for 1.5 metres out each end, for the roof halves to roll out on.
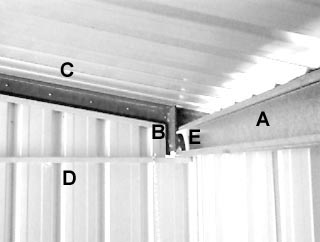 |
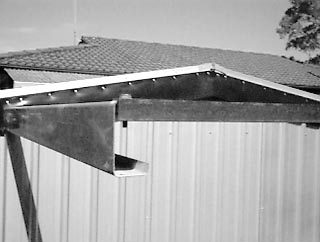
The purlin, wheel bracket and roof truss for one of the outer corners. AOne of the C-Purlin sections B The wheel bracket is joined to one of the outer angle iron roof trusses. Note the hole cut into the wall to allow the purlin to extend out of the shed. C The outer angle iron roof truss bolted to the outer edge of the roof section, with rubber flashing riveted to the other side of it. D 10 x 40mm ply support. This is bolted to the shed wall from the outside, and to the purlin inside. The ply also holds the shelf support chains. E A wheel. |
The original plan was to bolt the C-Purlin on the uppermost edge of the walls on the outside. But we soon realised that because the doors extended all the way to the top of the walls, we could not do this and still expect to open the doors. So the C-Purlin was positioned on the inside, with slots cut out of the end wall corners to allow the C-Purlin to poke out through the end walls. This has the added advantage of keeping muck out of the C-Purlin, by having the majority of the exposed track inside the shed. There is a slight disadvantage of having to cut slots into the walls, which could allow wind and rain into the shed, but after several bouts of heavy rain, it seems to be coping well.
To keep the weather out of the gap between the to shed halves when closed, two lengths of galvanised flashing were purchased from Mitre 10, and with a little retro-fitting, mounted to the western side roof half, so as to cover the gap. This is shown below. As an extra precaution against water leaking into the gaps during a heavy rain, several layers of adhesive rubber strip were placed along the entire length of the inner roof truss of each roof half.
|
|
The inner edge of the western roof half is shown here. A - The flashing is riveted to the roof and extends out to cover the gap between the two roof halves when closed. B The tesamoll rubber strips provide a water-tight seal between the two halves of the roof when closed, as well as buffering the sound of the two halves coming together when closing. The tesamoll is adhesive on one side and is attached to the angle iron roof trusses on each side of the centre-most truss. |
|
|
Mounting the roof on brackets in this way raised the roof by around 75mm creating a largish gap around the perimeter of the roof. A 3mm thick x 80mm wide rubber flashing was pop-riveted around the outer edges of both roof halves. The overhang covers all exposed areas between the roof and walls keeping out the wind and rain. On the outer ends, the rubber flashing is flexible enough to move either roof half further towards its opposite side if necessary. The outside of Freespace observatory on one end. The C-Purlin at each end, are connected by a 50x50x3mm angle iron support to stop the purlin from twisting with the weight of the roof when it is opened. The rubber flashing is also visible, pop-riveted to the side of the roof. |
Security
|
|
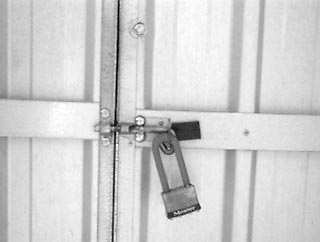
Security is almost a non-issue with these sheds. All bolts and associated items are simply pop-riveted to the shed. Shown is the pop-rivets replaced by 6mm ‘blind’ cup-head bolts. These are a lot more difficult to remove and all latches have had this modification. As well as the obvious main padlock on the door latch, several other very clever locking mechanisms have been added to the doors which will remain mysterious. |
Naturally, secrecy is a good security measure so I have not included all of the security measures that have been implemented, but some of them are very inventive. As for secrecy, the shed looks like a shed, but I've posted this on the internet so it's no secret what it really is. Sharing the information and experience with others who are interested requires it to be freely available, and in the true nature of science, this is more important than worrying about the consequences of drawing attention to yourself from those with low moral standards.
The Pier
Lastly, the concrete slab for the pier, (my first slab) was a 30x30x30cm cube made with 90kg of pre-mix concrete. The bolts to mount the pier were bought as a single threaded bolt, 1 metre long and cut into 4 pieces. I first thought of doing this with a hacksaw, but after making my first 1mm dent in the hardened steel, realised my blatant stupidity and let Mick use his angle grinder like he suggested in the first place.
Masonite was used to minimise vibration through the floor to create a gap between the surrounding earth and the outer walls of the slab. In hindsite, rubber would have been better, but the masonite is better than nothing. The jumping test still causes significant movement in the scope. So if you come around, please remember, no jumping in the observatory.
Enough of the bolts were left protruding from the slab, to allow a nut to be placed both above and below the pier base plate, to allow for levelling the pier. This has worked well and greatly simplified the process.
|
|
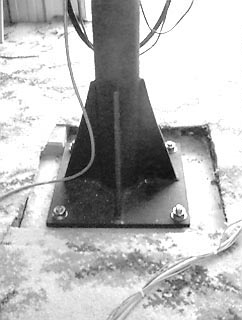
The pier is mounted onto a 300 x 300 x 300mm concrete slab. Each bolt is 250mm log and was bound within a wire cage constructed before the concrete was laid, for reinforcement. A plywood template of the pier base plate was created to hold the bolts in position while the concrete set. |
Power to the instruments
240V AC Power to Freespace observatory comes from an extension cord run through electrical conduit, which is placed inside the C-purlin closest the house. There is still plenty of room for the wheel to run in the purlin even with the electrical conduit in there. Basically, the shed needs to be plugged in, before use.
Nearly all of the telescope equipment and accessories that do not run on AC power, are powered by a single 12vdc, 11amp power supply. This DC supply powers the Skywalker, Dew heater, finder and guide reticle illuminators.
Flooring
After several failed attempts to find the perfect flooring material for Freespace observatory, I came across this indoor/outdoor carpet. I don't know what it is made of but it feels like synthetic carpet, is rubber backed and guaranteed not to go moldy. . After removing the original carpet to put the outfoor stuff in, I found that it was significantly moldy underneath and very smelly after only 6 months.
Beautifying Freespace observatory
|
|
Beautifying Freespace observatory was not in my original plans, but was given a womans touch. A few outdoor plants at the entrance, and some shade cloth draped underneath the C-Purlin makes for a perfect greenhouse environment for indoor plants, without hampering movement of the wheels and roof. The roof is shown open here. |

Legalities
As some know, I did have some problems with a neighbour during the construction of Freespace observatory. Because of this had to make inquiries into the legal requirements which need to be satisfied. Here is a short list of the points which make this particular observatory legal according to the Gold Coast City Council.
- A garden shed 3.0m x 3.0m or less requires no permit to erect
- Because no permit is required to erect the shed, it may be erected as you wish (i.e. with a roll-off roof)
- The shed may be placed on the property boundary if the following points are satisfied
- There is no window on the side facing the neighbour
- The shed is not made of combustible material
- The shed is more than 1.5m from the nearest neighbour bedroom
- The roof does not overhang the boundary
Of course any of these requirements may change over time and should be checked independantly.
Costs
A breakdown of all costs (Australian Dollars) that I can remember is listed. In total, the time taken to erect the shed and modify it was about 4 full days, taking into account that we did not really know what we were doing, and discounting completely the time taken to level and pave the area.
|
2.5 x 3.0 Metre Zincalume Garden Shed |
282 |
|
15000 x 30 x 8mm adhesive rubber strip – tesamoll |
55 |
|
2 x 100 x 6100mm lengths C-purlin |
76 |
|
10m x 50 x 50 x 3mm Angle iron |
32 |
|
1600 x 100 x 5mm Steel plate |
14 |
|
1000 x 16mm threaded bolt + 8 x 16mm nuts |
61 |
|
30 x 6mm Cup-Head Bolts, washers and nuts |
6 |
|
Other nuts, bolts and washers |
19 |
|
3 x 30kg bags of pre-mix concrete |
24 |
|
4 x 83mm Rubber wheels |
4 |
|
2 x 100mm x 2m lengths steel flashing |
11 |
|
12000 x 80mm x 2mm rubber flashing |
58 |
|
3000 x 16mm electrical conduit |
8 |
|
4 x Padlocks |
40 |
|
40m2 concrete pavers |
300 |
|
Welding |
50 |
|
1 metre x 4-channel PVC cable routing |
12 |
|
2 x 3 metres Indoor/Outdoor Carpet |
105 |
|
Total |
1157 |
|
Gifts, Donations or pre-owned Stuff |
|
|
Desk, shelves, drawers |
|