FITS4Win2 Header Data Utility |
||||||
|
The FITS4Win2 Header Data Utility is available for free download and use by the FITS user community. As well as being a bulk header editor, F4W2HDU allows quick display of raw headers, translating between property names and keywords, with synonymous keyword detection and a keyword library compiled from several sources, including the FITS Standard (NASA), NOAO, ESO and SBIG public keyword libraries.
F4W2HDU Installer Download
| If you are currently | And | Then |
|---|---|---|
| A FITS4Win2 Trial User | Your Trial is still active | Do not install this F4W2HDU The version installed with the Trial is needed for Trial Status reporting. |
| An Expired Trial User | You do not want to register FITS4Win2 but You do want to keep using F4W2HDU. |
Uninstall the FITS4Win2 Trial and install F4W2HDU from below. |
| Using a F4W2HDU StandAlone Version | Your installed version is less than 1.3.0 | Download and Install the F4W2HDU StandAlone from below to update your current version. |
| Anyone else | You want to try F4W2HDU | You are welcome to Download and Install the F4W2HDU Stand Alone from below. F4W2HDU is Free for unrestricted use. |
v3.6.5 64-Bit for Windows 10 and higher |
v3.0.0 32/64-Bit for earlier than Windows 10 |
Minimum System Requirement Any 32 or 64-bit, Windows Vista, Windows 7, 8, 10 or 11 |
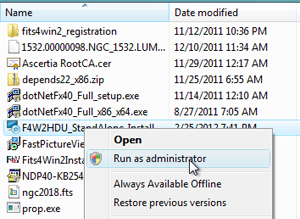
Run the Standalone Installer
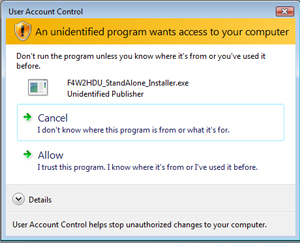
Right click the downloaded installer file and select 'Run as administrator' |
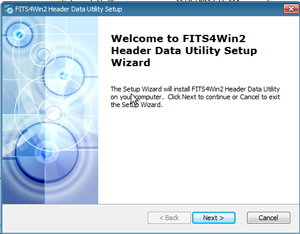
On the installation start screen- click "Next". |
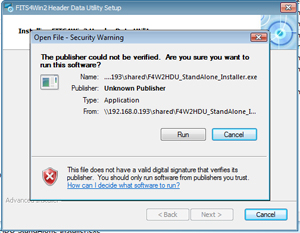
If the security warning appears - Click "Run" |
If the User Access Control screen appears - select "Allow" to continue. |
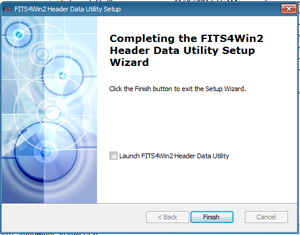 |
When the installation is complete you can check the "Launch" box to run F4W2HDU or just press "Finish". A shortcut to F4W2HDU can be found on both the "Desktop" and in "Start Programs". |
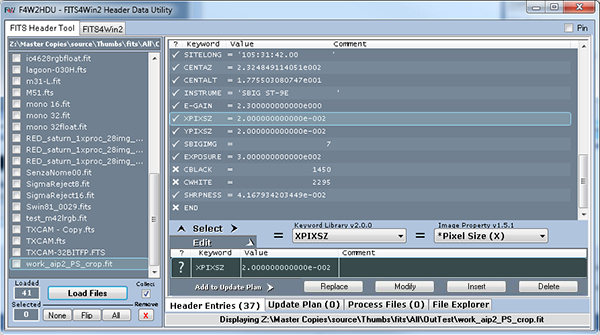
The 'FITS Header Tool' Overview
Load, View, Search and Update headers.

The FITS Header Tool screen. All functionality is arranged onto the four Tabs near the bottom |
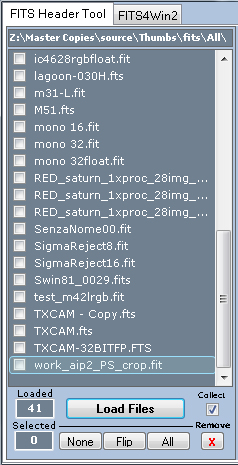
Loading FITS Files
|
Files can be loaded into F4W2HDU three ways:
|
|||||||||||||||||||||||||||||||||
|
|
Multiple files can be loaded simultaneously however any FITS file in a specific folder, can be loaded only once. Attempting to load the same file more than once will fail. Loading a batch of files where one or more are already loaded, will fail for the existing files, but succeed for the rest. Multiple files with the same filename and in different folders, can be loaded simultaneously.
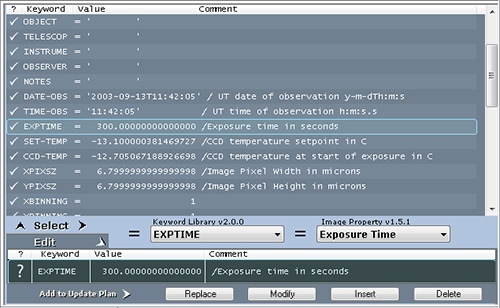
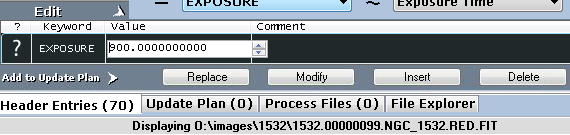
Header Entries Tab
Selecting a file from the loaded file list will display it's header in the Header Entries Tab. Headers are displayed in the order that they were read and displayed as they exist in the file. Header records are placed into the editor whenever a keyword is selected.
|
The Header View shows the raw header record. Keyword, Assignment Value and Comment. These conform to the FITS specification character lengths for each 80-byte header record:
|
| Column | Possible Values | Description |
|---|---|---|
| ? | Tick or Cross | A Tick means the value can be edited, whereas a Cross indicates a read-only value |
| Keyword | Any FITS keyword | As read from the file |
| Value | The value for this keyword | As read from the file. Non-string values are limited to 20 characters in columns 11-30 |
| Comment | A textual comment | As read from the file. Note that string Values may take up the entire Value+Comment length of 70-characters, whereas non-string values can have an independently editable 50-character comment string in columns 31-80. |
Searching for Keywords
Keyword searching is simply a matter of selecting a record from the displayed header or selecting an image property name or keyword from either of the selection lists. Details of the selected keyword are displayed in a tooltip by hovering the mouse cursor over the Keyword Library list. Search results are shown as symbols to the left of each selection list, described further below.
Keyword Selection Lists
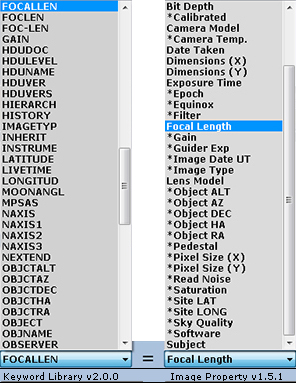 |
Selecting an entry from the Keyword Library (left) or Image Property (right) lists as shown here, will display an exact or synonymous match in the other list as well as the displayed header (below). Both lists are in alphabetical order.
|
Keyword Search Results
When a keyword is selected either from the header, Keyword or Property selection lists, the search results are indicated by an equivalence symbol at left of each list. Left of the Keyword list, the symbol represents the relationship between the listed library Keyword and the displayed Header. At left of the Property box indicates the relationship between the listed Property and the listed library Keyword.
| ||||||||||||
| The direction of the match is determined by whatever was selected and can be seen by hovering the mouse cursor over the equivalence symbol. Read more about synonymous keywords below. |


Header Keyword Search
When a Header Record is clicked, the two selection lists are searched for a match and synchronised to the header keyword. If the keyword is not found, it is considered of unknown type, but can still be edited as a string.
Synonymous Keywords
Some keywords have been duplicated and represent data for which a keyword already exists. For example, EXPTIME, EXP-TIME and EXPOSURE are all commonly used to represent the exposure time in seconds. Similarly APTDIA and APT-DIA can both represent the diameter in millimetres of the optical aperture. F4W2HDU will detect the presence of a number of synonymous keywords, when:
A Keyword is selected and does not exist in the search target, but a synonymous keyword is found.
In the following example: EXPOSURE was selected from the Keyword Library List and is not found in the current header. But synonymous keyword EXPTIME was found and is highlighted in the header view.
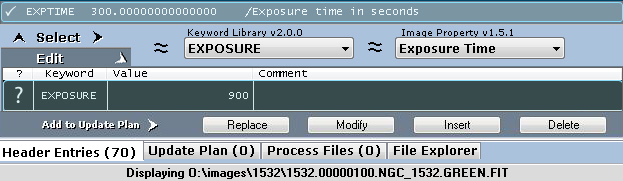 |
| EXPOSURE, EXPTIME and EXP-TIME, are all synonyms for the image property 'Exposure Time'. The relationship shown by the equivalence symbols and described by hovering the mouse cursor over the symbol. |
Multiple Synonyms: There may be valid reasons for using two different keywords to represent exactly the same value in one header, so F4W2HDU will not stop you from inserting a keyword into a header that already contains a synonymous keyword. If this is to be done deliberately, care should be taken to ensure that the synonymous keyword values match.
Differing values for synonymous keywords may constitute a data integrity issue and may manifest issues with software that make use of that data. FITS4Win2 , will always look for a 'Base' keyword first and Synonyms next when providing metadata to Windows. This is described further below.
FITS4Win2 and Synonymous Keywords: The FITS4Win2 Property list contains all of the property names supported by the current version of FITS4Win2 and these are mapped to "Base" keywords in the FITS list. It is not necessary for a 'Base Keyword' to exist in order for FITS4Win2 to provide the correct metadata to a Windows image property if a synonym exists.
If your files contain synonyms to F4W2 Base Keywords, these can be updated instead of the Base Keyword and FITS4Win2 will use them.
See the table of supported Windows Properties with matching Base and Synonymous Keywords in the FITS4Win2 manual entry, FITS4Win2 Property Keyword List.
Planning Updates
New Update Plan entries are created from the current data in the Editor. Whenever a keyword is selected as described above, the keyword is placed into the Editor where it can be used as an update reference. For example, if a header record is selected from the displayed header, the header data is placed into the editor where it can be used as is to reference a deletion or insert. To update this particular value, the editor value must be modified from that in the header, prior to pressing the Modify button, to plan the modification. The process is described further below.
The Editor
The editor is the basis for all header updates If you want to Modify a header record for example. You must first click on the header record that you want to change. That record will automatically be put into the editor where you can change either or both of the Value or Comment components. Pressing the "Modify" button will then insert a plan entry to replace any header records matching the selected one, with the newly entered values from the Editor.
 |
||||||
In the first column of the editor is a symbol representing the Editor data Status as shown below.
|


Editing Data
Changes can be made to the Value by clicking inside the Editor if the current keyword is editable. Non-string values can also have the Comment field entered and/or edited independently of the value, by clicking the Comment section within the editor. The editor Value and Comment sections are aligned with the header grid above them (not shown).
|
| Data from the Editor is used to plan one or more Insert, Modify or Delete actions, by pressing the appropriate button. The following table describes how each of the update types are applied to headers when the Update Plan is Executed. |
Replace - Wildcard replace of data for this Keyword. Only the keyword is matched in the file and whatever data exists for it, will be replaced in all files. Take Care with this option.
Modify - If the edited keyword exists in the displayed header, the new data can be treated as a modification to existing header data.
This update will be applied to a file header, when an exact match is found for the entire 80-bytes of Keyword, Assignment, Value and Comment of the target record. Existing Values are replaced by the new editor Values and may be either Keyword Value or Comment. If the editor keyword exists in the header but with different data, the update will not take place and the original values are left unchanged. This is used to correct keyword Values or Comments.Insert - The entire record from the editor is treated as an insert. This update will be applied to file headers when the editor Keyword is not found in the header, it will be inserted with the Values from the editor. If the keyword does exist in the header, the insert is not performed and the original record is left unchanged.
Delete - If the current editor Keyword exists in the displayed header, it can be used to target an exact-match deletion.
This update is applied to a file only when an exact match is found for the entire 80-bytes of Keyword, Assignment, Value and Comment. If the editor keyword does exist in the header, but with different data, then the update is not performed and the original data left unchanged. This is used to remove specific header records.
Update Plan Tab
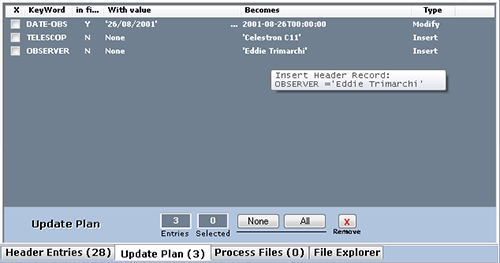 |
Note All update plan entries are applied to files during processing. Any unwanted entries should be removed before processing. The update plan contains each entry from the editor that was committed with one of the plan buttons. It can be reviewed and edited here prior to applying the plan to your files. Hovering the cursor over an update plan entry will display it in a tooltip. |
| Column | Possible Values | Description |
|---|---|---|
| X | Checked or Unchecked | Used only for selecting entries for deletion from the plan |
| Keyword | The target FITS Keyword | The Keyword to search for during header update (Save) |
| In File | Y or N | Inserts will require that this Keyword does not already exist in the file. Updates and Deletes will require that the Keyword does exist in the file. |
| with value | 'Value to match' for Exact Delete or Update 'None' for inserts, 'Any' for Keyword delete |
The Keyword must have this Value to be updated |
| becomes | 'New Value' or 'Deleted' | Keywords with the above Value will become this value |
| Type | Update, Delete or Insert | The type of this update |
Apply Updates - Process Files tab
Here is where you apply the Update Plan to syour selected files. A running log can be opened, viewed and appended, or replaced. The output path for saved files can be selected and all other runtime options are here.
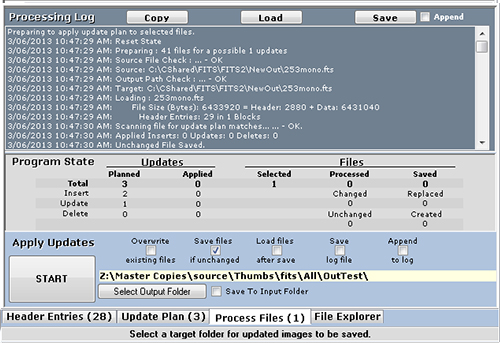 |
To Apply the update plan to files: |
| Checkbox | Checked | unChecked |
|---|---|---|
| Overwrite Existing Files | Overwrite existing files without prompting | Do not overwrite existing files. |
| Save Files if unChanged | Save files that are unchanged after processing. | Only save files that were updated during the run. |
| Load Files after Save | After a file is saved, load it into the File list. | Do not load saved files. |
| Save Log | Save to the Run Log during processing. Note that the "Append Log" checkbox also applies here. |
Do not log execution. |
Select the Output Path - On the Process Files tab, labelled TO.
Sets the path where files will be saved. It is displayed in the RUN section on the Process Files tab.
The output path for saved files can chosen by pressing the 'Folder' button.
Overwrite Notes: For safety, Overwriting files requires two settings. The "Overwrite Existing Files" checkbox above, must be set and the Output Path must be "Input". Input is specified by pressing the "Input" button on the right-hand side of the path display.
When a specific folder is chosen for output, all files will be saved to that folder.
Files can only be saved to either the original input folder (which can be arbitrary) or a single selected output folder, chosen by pressing the "Output" button.
It is possible when saving to a folder other than the input folder that files may already exist there. In this case, Overwrite must also be checked for newly updated files to be saved.
Program State - On the Process Files tab, labelled STATE.
 The State is a summary of current settings selected. The Planned and Files counts respectively show the number of Updates planned and the number of Files selected for processing. All other counts show results the previous execution and will be 0 otherwise. |
Run Logs- On the Process Files tab, labelled Run Log Viewer.
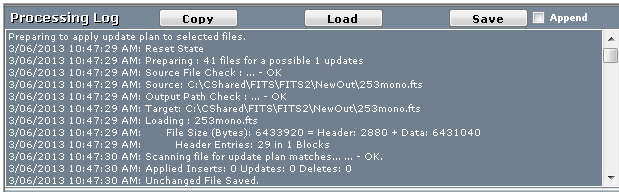 The run log summarises all processing done during previous executions. 'Append Log' determines whether the log will be overwritten, or appended-to when the 'Save' button is pressed to save the displayed log. |
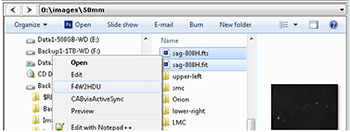
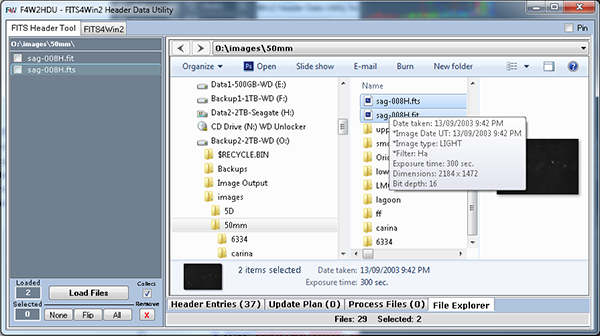
File Explorer Tab
The File Explorer is a fully compatible Windows 7 Explorer that can also be used to load files into F4W2HDU.
See the FITS4Win2 Explorer guide for examples.
|
| Layout and view settings are the same as described for Windows Explorer in the FITS4Win2 guide. |
|
|
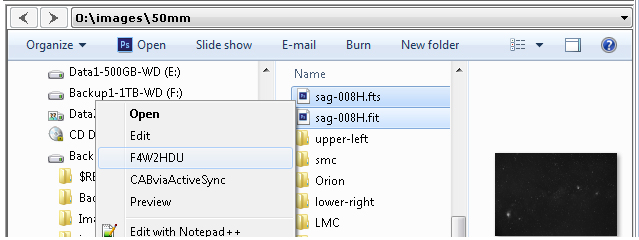
Files can be loaded into F4W2HDU from the File Explorer, by selecting the files and dragging them into the 'Loaded Files' window, or right-clicking the files and selecting F4W2HDU from the context menu. |
FITS4Win2 Tab

|
The FITS4Win2 Tab displays the installed package version and registration status at top-left. There are four informational tabs in the center panel two of which; Installation and Registration, are further described below.
FITS4Win2 Installation Tab
All installed components of FITS4Win2 are shown here along with the installed version. Updates for FITS4Win2 and F4W2HDU can be checked here, downloaded and installed if needed.
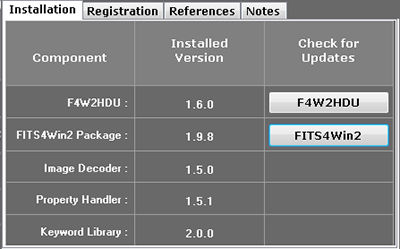 |
If FITS4Win2 is installed, the version of each component is shown. Standalone F4W2HDU installations will show "Not Installed" for all but the F4W2HDU version. |
FITS4Win2 Registration Tab
If a FITS4Win2 license is found on the current machine, the registration name and code are displayed here. In the following example, a 14-day trial is active. The trial status is shown where registration details would otherwise be
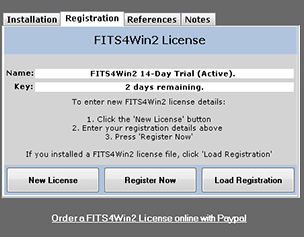 |
If you have purchased a license, follow the on-screen registration instructions to register your trial Note the trial is never the latest version of FITS4Win2 which is license holders can download any time. A license includes the latest version which will replace the trial when installed. To buy a FITS4Win2 license, click here |
Displayed Tips
Almost every control on the form has tool-tips. Hold the mouse over anything to see what information is displayed, for a given control.
FITS Notes
FITS4Win2 has been tested with images from hundreds of sources. Including photographic images from amateur astronomers and professional telescopes like the Hubble Space Telescope and NOAO, as well as NRAO radio images.
Keyword definitions, values, data types, formats and implementations can vary and F4W2HDU tries to stay out of the way . For example:
Strings surrounded by single quotes - The application of quotes can seem arbitrary and haphazard across applications. F4W2HDU will leave quotes where it finds them, but will not add quotes to newly created string values. They may be explicitly entered as part of the string value.
Keyword Interpretation - For example, some software incorrectly use the APERTURE keyword to represent the aperture diameter in millimetres. APERTURE is defined as a string value representing the name of the aperture used and APT-DIA is the correct keyword representing a real number for the aperture diameter. F4W2HDU will correctly treat APERTURE as a string if edited, which means that if you need it to be a number for whatever reason, you can still enter a number value for it. APERTURE will not be treated as a Synonymous Keyword for APT-DIA, as it does not represent the same value.
Keyword source dictionaries - Where possible, F4W2HDU will display the source dictionary from which the keyword details were referenced. Although there are a number of identified synonymous keywords , there is probably a lot more, originally implemented for whatever reason, maybe a typo by a programmer. For example, FOCALLEN, FOC-LEN and FOCLEN all represent focal length in millimetres. Though all three have been identified within FITS files, not all have been identified in any specific FITS dictionary. F4W2HDU will treat all three as synonymous. Keywords from unknown sources are shown as being from library 'OTHER'.