|
FITS File Image and Header Keyword integration with 32 and 64-bit Windows Vista, 7, 8, 10 and beyond. | ||||
|
FITS4Win2 Introduction
Flexible Image Transport System or 'FITS' files, have for decades been the standard image format for the interchange of scientific image data and is used extensively with astronomy ranging from scientific research with space-based telescopes to backyard astrophotography.
FITS files typically contain one or more images with associated metadata represented by a collection of Keywords in one or more header blocks (called Cards). Headers must contain the information needed to access and decode the image data, but may also contain virtually unlimited metadata related to the image data.
FITS is largely unrecognised outside of the scientific community. Mainstream graphics software companies tend to ignore FITS images completely and this has given rise to some third-party format plug-ins like, FITSPlug for Photoshop that enable images to be processed with specific software. FITS4Win2 removes the dependence on any particular software by giving control to Windows by integrating the images and keyword data with the windows image and property systems. FITS images become just images and Keywords become Image properties.
FITS4Win version 1.0 was originally created for earlier Windows versions to address some of these issues and now FITS4Win2 brings that concept into the present by integrating FITS files with Windows using the latest related Microsoft technologies on 32 and 64-bit Windows 7, 8, 10 and is expected to be supported in future Windws versions.
FITS4Win2 adds two primary functions to Windows:
1. Displaying FITS Images. Images are shown wherever and whenever image previews or thumbnails would appear and allows full-sized images to be loaded into most of the latest Windows applications that handle images. Like Windows Explorer, File Dialog boxes, Windows Photo Viewer, Movie Maker and Microsoft Office components like Outlook, Word, Excel, Powerpoint, etc.
2. Displaying FITS Keywords. A Property handler integrates FITS header keywords into the Windows property system enabling Windows to access and use keyword data as standard image properties and enabling images to be viewed, searched-for, selected, sorted or otherwise grouped by Keyword values using all the functionality of Windows Explorer.
FITS4Win2 maps keyword data to standard Image and Photo properties like, Author, Subject, Camera Model, Lens Model, Focal length, etc. and also provides a custom property set for FITS keywords that have no equivalent standard image property like, *Object RA, *Object DEC, etc.
Click here to see the complete list of supported keywords and properties.
In the process of laying bare the internals all FITS files, it's not unusual to discover inconsistent or incorrect entries. These can be repaired with the FITS4Win2 Header Data Utility, F4W2HDU.
3. F4W2HDU, is a bulk header update utility included in the FITS4Win2 installation package.
The utility is specifically designed for finding and updating FITS4Win2 property keyword values across multiple files. Though it is not limited to only the keywords FITS4Win2 recognises as property keywords and is fully functional even without FITS4Win2 installed.
If you want to use F4W2HDU without FITS4Win2, you can download it here: F4W2HDU Standalone Download.
Get the FITS4Win2 14-day Trial
Click the following link to send an email request for the FITS4Win2 Trial download link.
FITS4Win2 14-Day Trial Request
You need enter nothing in the email body, just leave the Subject line intact and
a return email will be sent containing a link to the Trial Download.
The latest version of F4W2HDU is included and can be used to check the number of days remaining in your trial, which starts when the Trial is installed. After 14-days FITS4Win2 will remain installed, but will cease functioning and F4W2HDU will report that the Trial has expired.
On expiry, you have two options:
i) purchase a license and register the trial with F4W2HDU , or
ii) Uninstall FITS4Win2 using Control Panel 'Programs and Features'.
FITS4Win2 Trial Notes
- The FITS4Win2 Trial is fully functional for 14 days immediately following the first installation date.
- FITS4Win2 can be registered at any time during or after the Trial period.
- If the Trial expires, you should do one of the following...
- Purchase a License and Register it using F4W2HDU
-
Uninstall the Trial from 'Control Panel', 'Programs and Features' Tab.
If you remove the Trial and want to keep using F4W2HDU, you can download the F4W2HDU standalone version .
Please remove the Trial before installing it. .
- Reinstalling the Trial will not change the Elapsed Trial Period.
- Turning back your system clock will not change the Elapsed Trial Period.
- Turning back your system clock will cause the Trial to crash and take Explorer with it
- Turning back your system clock is a bad idea. Please don't try it.
Installing FITS4Win2
FITS4Win2 Installers can only be downloaded by Purchase or Trial Request
The four available types of FITS4Win2 Installer are:
|
Run the Installer by right-clicking it and selecting 'Run as Administrator'. If FITS4Win2 has not been previously registered on the current computer, you will next see one of the following:
| Purchased Installer | 14-day Trial Installer |
|---|---|
|
|
|
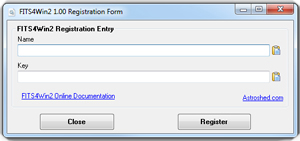
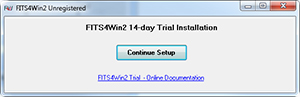
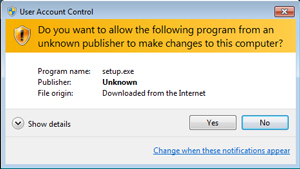
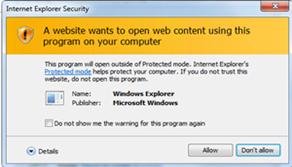
After successful registration or Trial selection, the installer will continue. If at some point you see either of these dialog boxes, you can safely respond to them as shown below.
|
|
First Use
All standard Windows functions dealing with Images and Keywords become instantly available after FITS4Win2 installation. No configuration is needed, with all standard Windows Layouts and Views available.
A shortcut to the FITS4Win2 Header Data Utility F4W2HDU will be installed on the Desktop and worth a look. Much of the functionality FITS4Win2 brings to Windows is available in F4W2HDU, which includes a 100% compatible Windows Explorer built-in.
Windows Explorer
Arranging the on-screen Panel Layout
Windows Explorer displays files in a Main Window which has three panels that can be switched on or off to your needs. To access the Panel display controls, click 'Organize' then 'Layout' from the Explorer toolbar as shown below. Note that Windows 7 is shown and some differences exist in the menus and layout positions compared with Windows 8.
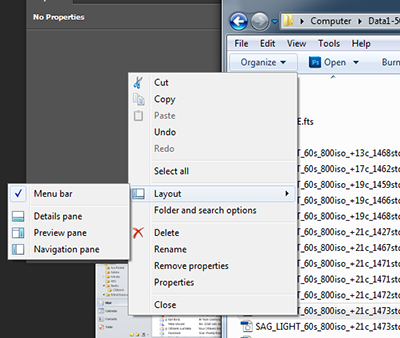 See sample screen layouts |
The small flyout menu at far-left contains diagrams showing where each individual pane will appear relative to the Main Window Navigation Pane Located on the left side of the explorer window is horizontally resizeable and displays the windows folder tree for navigating the file system.Preview Pane Located on the far-right side of the Main Window is a horizontally resizeable preview of the selected image, scaled proportionally to fit in the entire image. Details Pane Located at the bottom of the Main Window is vertically resizeable and is configured to show all kwyword properties made available by FITS4Win2. The actual number of properties displayed may be limited by two things:
|
View Selection
Windows Explorer provides a number of different 'Views' of files and metadata (see the 'View List' below). FITS4Win2 provides data to all Explorer views to differing degrees, without requiring any setup after installation. But you can get a good deal more out of the system with a little Windows configuration.
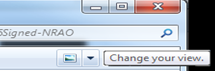
Changing Explorer Views - With the Change your view list.
|
The Change your view drop-down list is at the upper-right of Windows Explorer.
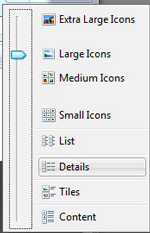
Click the small black down-arrow to get the View List at right and select the view you would like. Note: Details View is the most extensive Explorer View. It can be fully customised by allowing you to select, display and otherwise utilise any Keyword data required, as described next. |
The View List |
Custom Details View
|
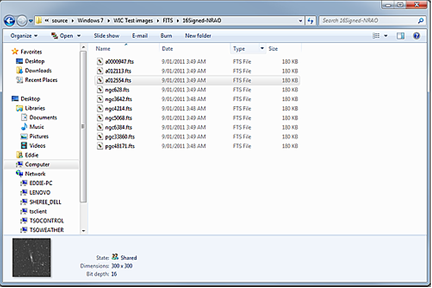
Selecting Details View for the first time as shown here, will reveal a set of default file properties that apply to all files. Namely, File Name, File Create Date, File Type and File Size in this example. Although keyword provided image properties are now visible in the details pane and file tips, they are not yet visible in the Detail View. To view our new FITS Image Properties in Details View we must first select them as described next in, Selecting FITS Properties. |
|
Selecting FITS Properties
|
|
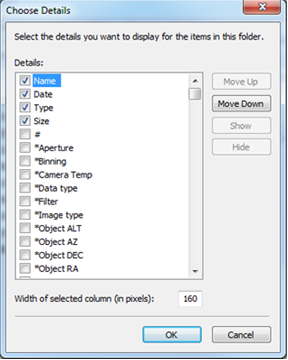
<<< To include the new keyword properties, right-click on the column heading button bar. The Choose Details List will appear as shown below. |

|
|
The Choose Details list contains all of the Windows properties in alphabetical order. Except for standard file and system properties, the only other properties returned for FITS files are those provided by FITS4Win2. The full list of Keywords exposed by FITS4Win2 is listed below. Some are standard Windows image properties and some are new, custom FITS Keyword properties which are prefixed by an *. Scroll through the list and check the box next to each property you want Explorer to display. Select OK, when done. If you like your new customised view and want to make it standard for all of folders, see the section on Standardising your custom folder view |
Sorting FITS Files - Image Dimensions example
In Details View whether in Explorer or a File dialog box, you have considerable flexibility with all the new keyword image properties.
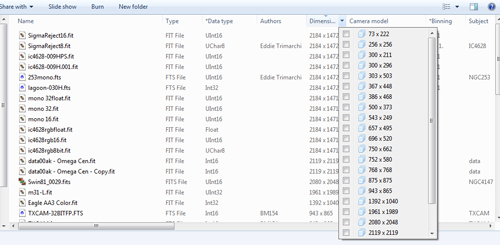
The column title in Explorer has multiple functions. It can be used to order the list, can be dragged to order the columns and is a Drop-down list that displays all values for that property across all files in the folder.
If you click the drop-down list for any property, you will see an ordered list of distinct property values for all of the files in the current folder.
|
Dimensions in this example, shows all of the image dimensions that exist in the folder. Notice that each image dimension has a check-box next to it. Selecting one or more of these checkboxes will hide all files that don't match the selection. Note that you can also combine other property selections to further narrow the displayed list. This functionality applies to all properties and provides great flexibility for identifying and selecting images with specific property values. This is not limited to Explorer and is available in virtually all File dialog boxes independent of the application being used. |
Selecting / Sorting FITS files using keyword / image property |
FITS in the Explorer Details Pane
The Details Pane in Explorer, is at the bottom in Windows 7 and the side in Windows 8 and 10. It contains a thumbnail and the full set of Image Properties that exist in the currently selected FITS file.
FITS4Win2 configures the Explorer Details Pane to display all available keyword properties, regardless of the Current View.
Even so only data actually found in the header will be displayed. Therefore, different images may display different sets of properties, as below.
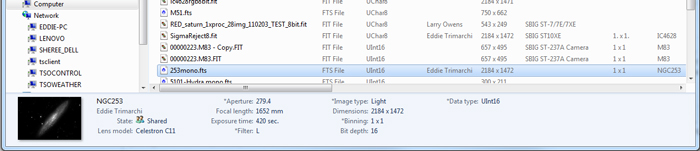
Preview Pane with Details view
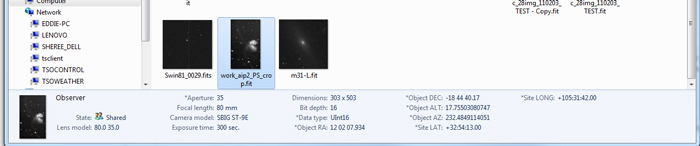
Preview Pane with Large Icons view
The number of properties displayed will also depend on the size of the pane. The pane will only reveal them all if it is large enough and it can be resized at any time by left-click-dragging the top bar of the pane. Up or down.
Standardise Views
Once you have setup the FITS keyword properties you would like to display in your Details View, you can propagate the view to all of your folders. Here is how to do it.
For this example, we will use Details View but the same process applies to whichever view you need.
1. Select the folder that you have configured in Details View as above.
2. On the toolbar, click Organize, and then click Folder and search options.
3. In the Folder Options dialog box, click the View tab and then click Apply to Folders.
4. Now click OK.
All of your folders will now appear the same as the current folder, with your customised property and view selections.
Lifetime of a View
Folders can be individually customised at any time and will retain their settings until changed again.
Except for Windows Libraries like "Pictures", "Documents" or any customer folders added to the Windows library. These cannot be permanently customised. If you do customise the view of a Windows Library, you will find that it will revert back to it's standard view after Windows restart. If you must store FITS images in Windows Libraries, then these views can not be permanently customised.If you want permanently customised views, keep your files in standard folders.
FITS in Dialog Boxes
With FITS4Win2 installed, you will notice that whenever FITS file names are visible within Windows, images and metadata are also available.
|
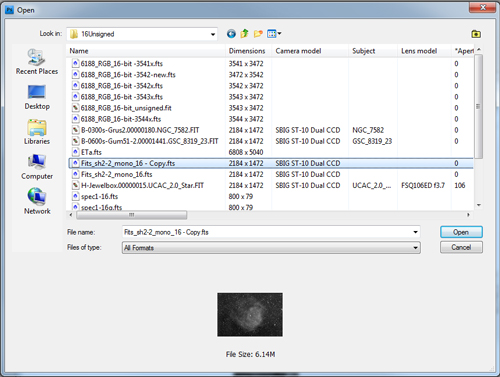
File Operation Dialog boxes like File Open are as configurable as Windows Explorer: This is the Photoshop File Open Dialog box showing property details view with a Thumbnail NOTE that FITS4Win2 will not allow you to actually load a FITS image into Photoshop because Photoshop is not currently WIC compliant. To load FITS images into Photoshop you require a dedicated Photoshop FITS plugin, such as FITSPlug or Liberator. Naturally,I recommend FITSPlug but Liberator is also a fine tool. |
|
|
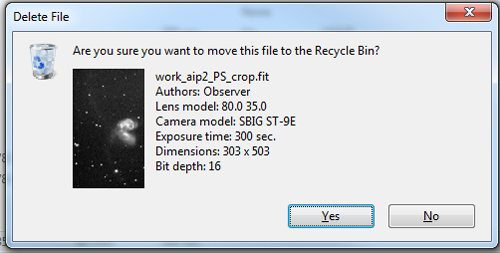
Delete, Copy, Move and Overwrite Dialog boxes have a fixed set of meta-data displayed as shown in this example of a standard Delete dialog box. More or less header information may be displayed in dialog boxes for different FITS files and is determined by which data exists in a particular header. |
|
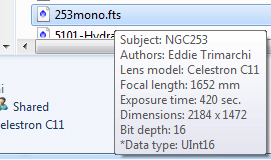
FITS in Tool-tips
|
|
A fixed set of Keyword data is displayed in tool-tips, when the mouse cursor hovers over any FITS file in Windows as seen here. As with all property display, only properties with matching keywords that exist in the file, will be displayed. More or fewer properties may be displayed than are shown here. |
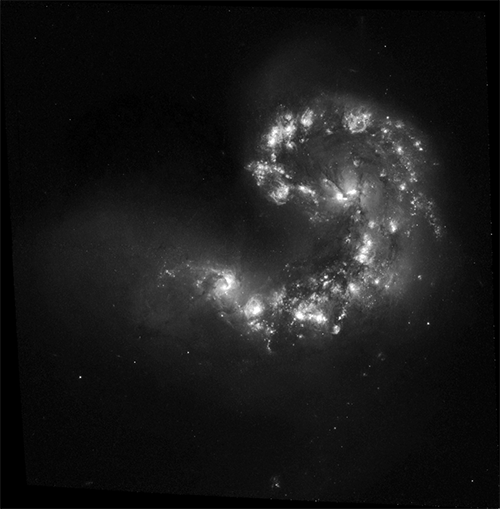
FITS in Applications. Microsoft Office 2010 Example.
|
Microsoft Office 2010 fully supports WIC image types, enabling you to load images directly into a Word document, for example. This 16-bit FITS image, taken with the Hubble Space Telescope, was directly loaded into this document with Word 2010 using the standard Insert/Picture function. The original 16-bit image was first sampled to a smaller size then saved as 16-bit for this example. If you need to, you can directly load FITS images into Excel, Outlook, Word, PowerPoint, Movie Maker, or any other current Microsoft product that can load images. Images can be loaded into all of the many WIC-compliant Windows programs that allow images to be loaded. |
|
Supported Keywords
It would not be practical to create a Windows Property for every possible FITS keyword. And there is also a performance requirement to consider when reading and displaying properties from images as the mouse moves over them. For these reasons only what could be considered generally useful Keywords have been included in the V1 property system sourced from the following public keyword libraries:
FITS Standard (NASA), NOAO, ESO and SBIG
Below is the complete list of keywords and matching image properties from V1.20+ of the property system, included with FITS4Win2 V1.50+. If you have a specific need for keywords not currently included, please drop a note to eddiet@astroshed.com and let me know what you need.
Properties are shown in the table below in two alphabetical lists. The first list shows standard image properties that FITS4Win2 supports. The second list shows custom image properties created by FITS4Win2. Custom properties are all prefixed with an asterisk (*) in order to group the custom properties together near the top of the global property list. This makes them much easier to locate than if they were listed alphabetically, as the standard properties are.
| Standard Image Property |
Search Term System.* |
Base Keyword | Synonymous Keywords | Notes |
|---|---|---|---|---|
| Author | Author | OBSERVER | AUTHOR | The name of the person who took the image |
| Bit Depth | Image.BitDepth | BITPIX | None | Bits per pixel. 8, 16, 32 or 64. Combine with '*Data type' if needed. |
| Camera Model | Photo.CameraModel | INSTRUME | None | The name of the camera model or type |
| Date Taken | Photo.DateTaken | DATE-OBS | FITSDATE, DATE |
(Local Time) Date/Time when the exposure commenced. Read the note on Windows and UTC. |
| Dimensions | Photo.Dimensions | NAXIS1 x NAXIS2 | None | 'Horizontal x Vertical' image dimensions in pixels |
| Exposure Time | Photo.ExposureTime | EXPTIME | EXPOSURE | Exposure time in seconds |
| Focal Length | Photo.FocalLength | FOCALLEN | FOC-LEN, FOCLEN | Focal Length in Millimeters |
| Lens Model | Photo.LensModel | TELESCOP | None | The name of the lens or telescope |
| Subject | Subject | OBJECT | OBJNAME | The subject of the image |
| Title | Title | TITLE | OBJECT, OBJNAME | The title of the image |
| Custom Property |
Search Term Astroshed.FITS.* |
Base Keyword | Synonymous Keywords | Notes |
| *Air Mass | AirMass | AIRMASS | None | Optical path length through earths atmosphere |
| *Camera Angle | Angle | ANGLE | None | Image rotation angle in degrees |
| *Aperture | Aperture | APTDIA | APT-DIA | Lens or Telescope Aperture in Millimetres |
| *Barometric Pressure | Pressure | PRESSURE | None | Barometric Pressure at the site in hPa |
| *Binning | Binning | XBINNING x YBINNING | None | Image Binning used in this image |
| *Calibrated | Calibrated | CALIBRAT | None | Image has been calibrated. 0 or F, 1 or T |
| *Camera Temp | CameraTemp | CCD-TEMP | CCDTEMP | CCD Camera temperature in Celsius. |
| *Data type | Datatype | Derived (see notes) | None |
The Data Type used to store the image data. Unsigned Char, Integer, Unsigned Integer, Floating Point or Double Precision |
| *Dew Point | DewPoint | DEWPOINT | None | Dew point at the site in degrees Celsius | *EGain | EGain | EGAIN | None | Electronic Gain in Electron Volts per ADU |
| *Epoch | Epoch | EPOCH | None | Epoch of celestial coordinate system |
| *Equinox | Equinox | EQUINOX | None | Equinox of celestial coordinate system |
| *External Temp | ExtTemp | Ext-Temp | TEMPERAT, AMB-TEMP | The external or ambient temperature in degrees Celsius. |
| *Filter | Filter | FILTER | None | The Filter used for this image. Note that filter naming is arbitrary. Entered via the image capture software |
| *Filter Wheel | FilterWheel | FWHEEL | None | The Filter Wheel used |
| *Flipped | Flipped | FLIPPED | None | Image is orientation is flipped |
| *Focuser | Focuser | FOCUSER | None | The Focuser name |
| *Focus Temp | FocTemp | FOCTEMP | FOCUSTEM, FOC-TEMP | The temperature of the Focuser in degrees Celsius |
| *Focus Pos | FocPos | FOCPOS | FOCUSPOS, FOC-POS | The Focuser position |
| *Gain | Gain | GAIN | None | CCD Gain |
| *Guider Exp | GuiderExp | TRAKTIME | None | Exposure time of the guider in Seconds |
| *Humidity | Humidity | HUMIDITY | None | Percentage Humidity at the observation site |
| *Image Alt | CentAlt | CENTALT | CENT-ALT | The Altitude at the center of the image frame |
| *Image Az | CentAz | CENTAZ | CENT-AZ | The Azimuth at the center of the image frame |
| *Image Date UT | ImageDateUT | DATE-OBS | FITSDATE, DATE | (UT) Same as Date Taken, without the local time conversion (See note below). |
| *Image Dec | ImageDec | DEC | None | Declination of the Image |
| *Image RA | ImageRa | RA | None | Right Ascension of the Image |
| *Image Type | ImageType | IMAGETYP | None | The usual four types are Light, Flat, Dark or Bias. As with Filter, naming is arbitrary |
| *Mount | Mount | MOUNT | None | The Telescope Mount used |
| *Object ALT | ObjectALT | OBJCTALT | CENTALT | Object Altitude |
| *Object AZ | ObjectAZ | OBJCTAZ | CENTAZ | Object Azimuth |
| *Object DEC | ObjectDEC | OBJCTDEC | None | Object Declination |
| *Object HA | ObjectHA | OBJCTHA | None | Object Hour Angle |
| *Object RA | ObjectRA | OBJCTRA | None | Object Right-Ascension |
| *Pedestal | Pedestal | PEDESTAL | None | Pedestal value added to pixel data |
| *Pixel Size | PixelSize | XPIXSZ x YPIXSZ | None | Pixel dimensions in microns |
| *Rain Rate | RainRate | RAINRATE | None | Rain Rate in mm per hour |
| *Rotator Angle | Rotator | ROTATOR | POSANGLE | The camera rotation angle in degrees |
| *Read Noise | ReadNoise | READNOIS | None | CCD Read Noise |
| *Saturation | Saturation | SAT_LEVE | SATURATE, SAT-LEVE, SATLEVE | Pixel saturation level for the camera |
| *Image Scale | Scale | SCALE | PIXSCALE | Image Scale in arc-seconds per pixel |
| *Set Temp | SetTemp | SET-TEMP | SETTEMP | The Software target set temperature |
| *Site Name | SiteName | SITENAME | SITE | The name of observation site |
| *Site Elevation | SiteElev | SITEELEV | None | Elevation of the Site in meters above sea level |
| *Site LAT | SiteLAT | SITELAT | LATITUDE | Site Latitude |
| *Site LONG | SiteLONG | SITELONG | LONGITUD | Site Longitude |
| *Sky Quality | SkyQuality | MPSAS | None | Sky quality in magnitude per square arc-second |
| *Software | Software | SWCREATE | PROGRAM | Title of the software that created the image |
| *Wind Direction | WindDir | WINDDIR | None | Direction of the wind in degrees |
| *Wind Gust | WindGust | WINDGUST | None | Wind Gust speed in meters per second |
| *Wind Speed | WindSpd | WINDSPD | None | Wind Speed in meters per second |
Operational Notes
Searching for FITS images by Keywords
FITS4Win2 adds the ability for supported FITS keywords (above) to be used for file searches using the full power of Windows Search.
Typing the 'Search Terms' listed in the table above into the Windows Explorer Search box, will search the current folder and it's child folders, for any FITS images matching the terms specified.
Note that the column title lists the prefix for the listed search terms that follow. All standard Properties are prefixed by System. followed by the search term listed. For example, System.Image.BitDepth:>8 with find FITS files that are greater than 8-bit.
All custom properties provided by FITS4Win2 are prefixed by Astroshed.FITS. followed by the term listed. For example, to search for FITS images taken with the Red Filter, you would use Astroshed.FITS.Filter:R to find any FITS images with an exact match of 'R' in the Filter keyword. Note that filter naming is somewhat arbitrary and you may have some files that use 'R' and some that have 'Red' in which case you can use Astroshed.FITS.Filter:R?? The question mark is a single-character wildcard, so this search will find any FITS images with a FILTER keyword that starts with 'R' and may have another optional two characters following.
Search terms can be combined using standard terms like 'AND', 'OR', and further qualified by terms like 'NOT' and '~', wild card characters '?' and '*' and much more. Here are some useful examples to give you an idea of just what is possible with FITS4Win2.
| Term | Means | Example | Finds |
|---|---|---|---|
| AND | Inclusive | System.Subject:NGC1365 AND Astroshed.FITS.Calibrated:1 AND Astroshed.FITS.FILTER:R | Calibrated images of NGC1365 taken with the Red Filter |
| OR | Selective | System.Subject:NGC1365 AND Astroshed.FITS.Calibrated:1 AND Astroshed.FITS.FILTER:R OR Astroshed.FITS.FILTER:H | Calibrated images of NGC1365 taken with the Red filter or Ha Filters |
| NOT | Not Exists | System.Subject:NGC1365 AND Astroshed.FITS.FILTER:R NOT Astroshed.FITS.IMAGETYPE:Flat | Images of NGC1365 taken with the Red filter except for Flats |
| = | Exact Match | System.FileName:="NGC1365" | Images where the Filename exactly matches 'NGC1365' |
| ~= | Like | System.FileName:~<"NGC1365" | Images where the Filename contains 'NGC1365' |
| * | Multiple Character Wildcard | System.FileName:NGC1365* AND Astroshed.FITS.Calibrated:1 | Images where the Filename starts with 'NGC1365', that are calibrated. |
| ? | Single Character Wildcard | System.Subject:NGC1365 AND Astroshed.FITS.FILTER:R?? | Images of NGC1365 taken with the Red filter where the Filter keywords starts with R with two or more other characters. 'Red' would also be found |
You can see that search capabilities are limited only by the metadata in your FITS headers, which is completely searchable using Windows search. To see what Windows Search is capable of, see the official Advanced Tips for Searching in Windows .
Synonymous Keywords:
In some cases, more than one keyword can represent a single image property. FITS4Win2 maps a single Base Keyword to each Image Property, but will recognise and use some synonymous keywords to provide a property value where the Base keyword is absent from the header.
For example, the 'Exposure Time' image property maps to the base keyword EXPTIME and synonymous keyword EXPOSURE. FITS4Win2 will find either value when providing Windows with the 'Exposure Time' from a FITS file, but will use EXPTIME, if both exist.
In all cases where both keywords exist, the Base Keyword will always be chosen for the property value. This should not present a problem as the values really should be the same.
F4W2HDU can identify all FITS4Win2 base and synonymous keywords. Read more about F4W2HDU and synonymous keyword handling.
Missing Properties or Values
When displaying properties of a file, windows will generally display only those for which a keyword exists in that header. However, there are two locations that display a fixed-collection of properties where missing Keywords will display an empty value for the associated property. These are:
- The File Properties/Details panel that you get by right-clicking a FITS image and selecting Properties.
- The Explorer Details View, where specific columns have been selected for display.
Some keywords are mandatory in FITS image files, such as NAXES, BITPIX, etc. others, like CCD-TEMP, OBJCTRA and OBJCTDEC, must be populated by the creating application.
FITS4Win2 includes a helpful utility specifically designed to find supported keywords, insert missing values and correct invalid data that may exist in FITS headers. Find out more about it in the F4W2HDU manual.
File Associations
All image display with FITS4Win2 is done without needing any file association with FITS image types. FITS4Win2 installation will not create or change any file associations.
Selecting Preview from the file menu will display FITS images in the Windows Photo Viewer for preview, but without requiring Photo Viewer to be associated with the FITS file types. This applies to previews only (i.e. any time you select preview from a FITS file context menu (right-click the file name)).
Selecting Open on a FITS file will load it into the associated viewer or editor, if one exists.
If FITS4Win2 is installed onto a computer without a pre-existing file association to FITS, you can still preview images and have full FITS4Win2 functionality without any program associated with FITS file types.
In this case, if you attempt to launch a FITS image, for example by double-clicking the file name, Windows will ask you to make a file association. This is not a requirement for FITS4Win2 and it will not appear in the application selection list. F4W2HDU will however and can be associated if you like, though you cannot view images with F4W2HDU, only headers. Otherwise, FITS4Win2 installed, you could associate FITS images with any WIC-compliant viewer, such as the Windows Photo Viewer, or Fast Picture Viewer.
To summarise, file associations are not required by FITS4Win2. With FITS4Win2, all WIC-compliant image loaders/viewers are compatible and can be associated with FITS images.
Supported FITS Files
FITS4Win2 supports reading of uncompressed mono and RGB, 8, 16 and 32-bit images via a WIC Decoder.
Only images wholly specified within the Primary HDU are displayed generally, with one exception :
Three-Plane Images with the second and third plane stored in extensions, are now loaded as RGB colour as per the ImagesPlus default FITS colour method.
Any FITS file with at least one image in the Primary HDU will be displayed.
Compressed images are not supported.
FITS4Win2 will not display an image for unsupported FITS files. Windows will display an icon for these images and attempting to open them will result in a 'Unsupported File Type' error.
All supported Metadata in the Primary HDU is available to the Windows property system for viewing, searching and sorting when interacting with FITS files.
Bayer Matrix Support - One Shot Colour (OSC) Cameras
Bayer Matrices are not explicitly supported by FITS4Win2, but they will still be read and displayed. Even though many OSC camera manufacturers save their images as FITS files, they are not FITS-compliant due to the fact that they require specific information about the matrix which does not exist in the header, in order to retrieve the correct colour information.
FITS4Win2 will read and process OSC pixel information as it does with any other FITS image, but the image will appear monochrome.
OSC FITS header data is read normally by the FITS4Win2 property handler, making OSC keyword image properties available.
Image Data Scaling
Raw, unprocessed astronomical images typically have a very low dynamic range with much of the object information bunched into the low end of the histogram. reading the data raw in this case would result in a black image on screen.
FITS4Win2 is designed to provide visual references of images and metadata for identification and classification of files. So in order to get some of the object data into a visible range, FITS4Win2 will perform a rudimentary linear stretch of low dynamic range images when they are detected.
UTC and the 'Date Taken' Image Property
'Date Taken' is a standard image property that in Windows, displays the Local Date and Time that the image was taken.
The FITS definition of the DATE-OBS keyword is essentially the same as the metadata definition for 'Date Taken'
i.e. A Coordinated Universal Time (UTC) 'Date and Time' value. Windows assumes that data for this property is a UTC value and in order to display a local date and time, automatically adjusts the value using the Time Offset from Windows Locale settings and this can lead to confusing results in some circumstances.
When DATE-OBS is saved with Local Time - Some image capture software allow you to save DATE-OBS as Local Time instead of UTC. This is not standard practice and can be misleading as no other supporting data is created in the header to specify which time scale was used. In the absence of this, we can do little but assume that the standard has been followed and the date is actually UTC. Windows will apply the time offset and the resulting date and time displayed will be incorrect.
This issue applies only to FITS images with DATE-OBS saved as local time. Other image types generally follow the meta-data standard and save 'Date Taken' as UTC.
When Image are not taken Locally - Another issue to be aware of is when images are not taken from the same location as the viewer. For example, from a remote observatory in a different time zone.
If images were saved using UTC at the remote observatory, when you view the images using FITS4Win2, Windows will use the Time offset from your local computer to calculate the local time for the viewer when the image was taken, rather than the local time at the telescope location. Things can even more confusing if DATE-OBS was saved using local time at the remote location, when Windows applies the viewers local time offset to it. You may be left scratching your head wondering what actual time and date is being displayed.
This issue applies to any image types that contain 'Date Taken' metadata, not just FITS images.
To be sure - The FITS4Win2 property "*Image Date UT" has been included to bypass these issues by providing a raw, unadjusted DATE-OBS dateTime value, though you will still not necessarily know whether DATE-OBS was saved as local time or UTC, you at least can be aware of these issues should you notice that your 'Date Taken' value appears to be a bit 'off'.
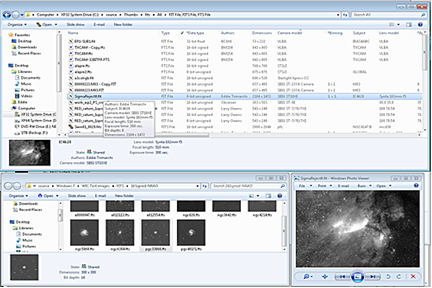
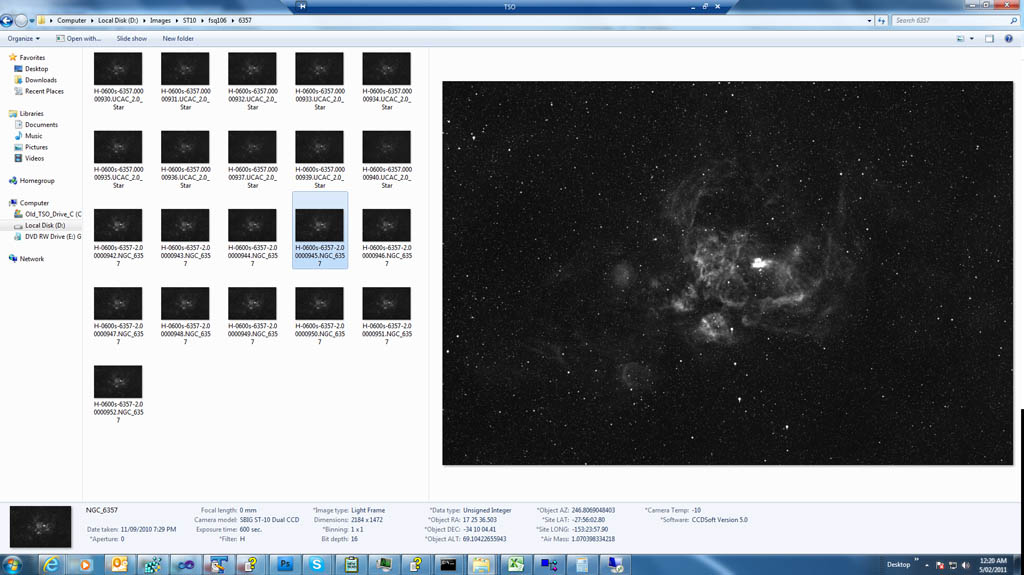
Examples of some Windows Explorer Views provided by FITS4Win2.
Click the image for a larger view in a new window.
|
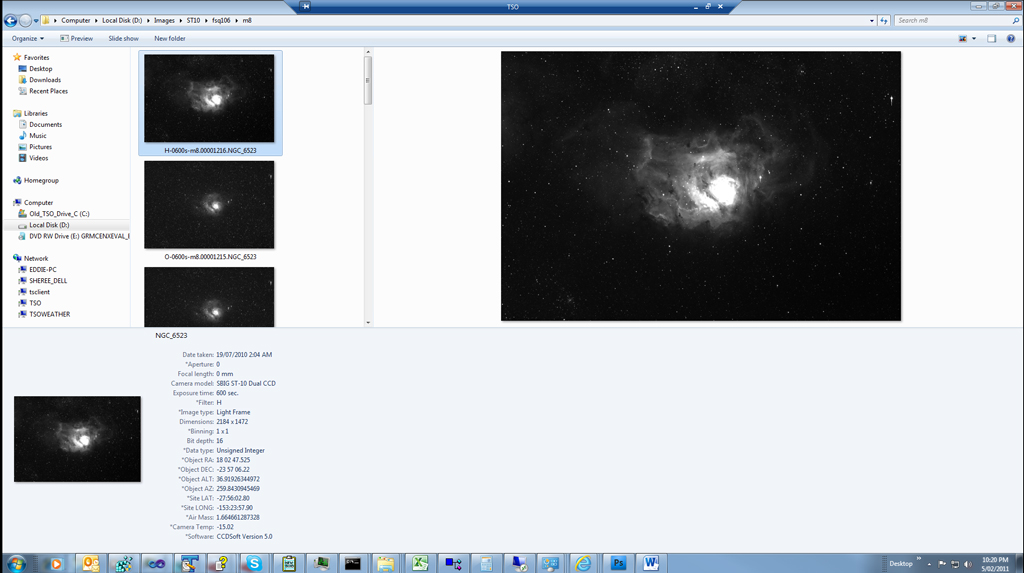
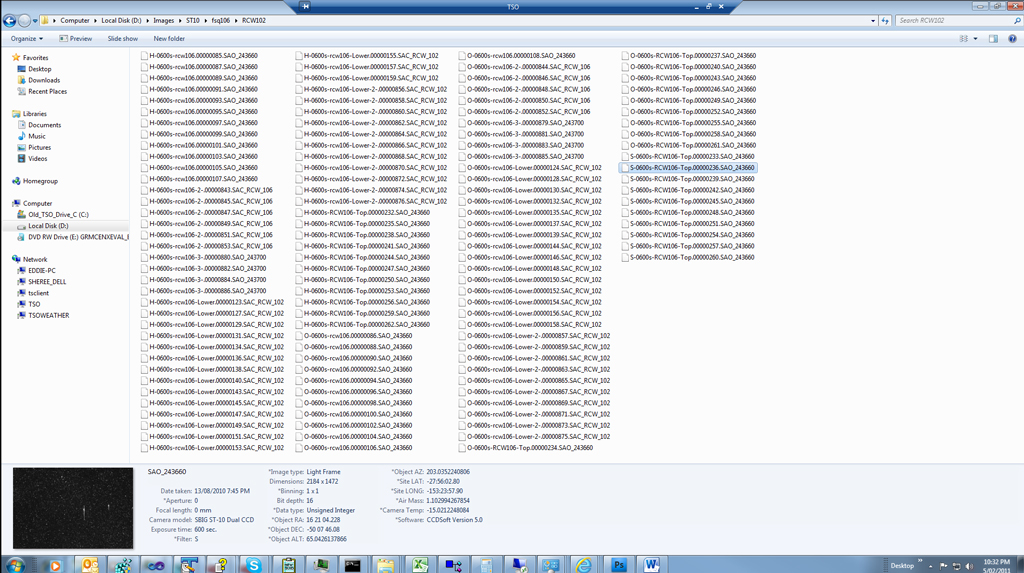
Raw Image Thumbnails, Preview and Details
|
|
|
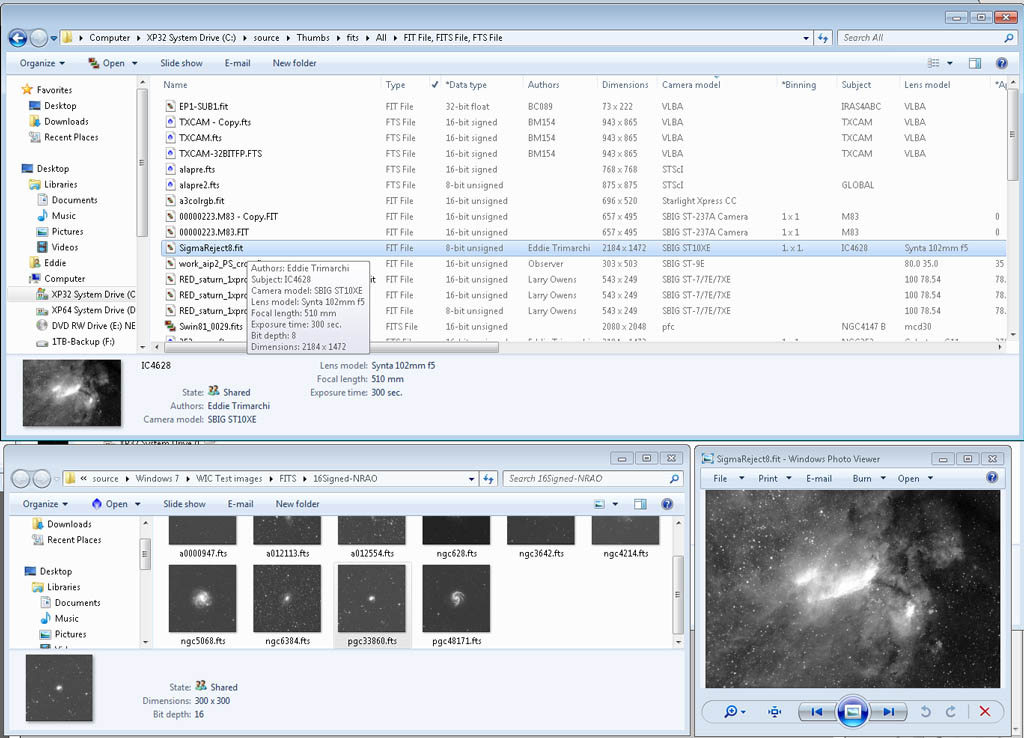
Multiple Window Example
Windows Photo Viewer and two Explorer Windows using different Views. |
|
|
Extra-Large Icons, Details and Preview Extra Large Icons View with extra-large preview image and extra-large details pane (bottom) for thumbnail and metadata. A useful view when you want Explorer images to appear at their largest possible sizes and still have all available Image Properties visible. |
|
|
List View Good for scrolling through a lot of files while scanning the large thumbnail and metadata in the details pane. List View, Preview: Off, Details Pane: On, Navigation Pane: On |
|
Windows Performance #1 - Folder Optimised for Pictures
File list refreshes in Explorer may take a very long time to complete, or may not complete at all. - The computer may appear frozen for short periods and mouse responses may lag too much for accurate cursor movement to be possible.
Solution: If the folder optimization is set to 'Pictures', change it to 'General Items' - Although this sounds counter-intuitive considering FITS folders are usually full of pictures, changing folder optimization to 'General Items' for all image folders, will not affect how your images are displayed and will increase performance.
To Change the folder optimization setting, right-click the folder and select 'Properties' then click the 'Customize' tab. In the 'Optimize this folder for: ' section, change 'Pictures' to General Items' as shown below.
| Optimizing image folders for 'General Items' rather than 'Pictures' will not affect how images are displayed and will increase system performance. |
Windows Performance #2 - The Windows Content Indexer
The Indexer, if turned on will scan your system for changes in order to maintain indexes to your system's content. These indexes are used by Windows Search, which is in-turn used by apps like Explorer and Outlook for searches. The indexes maintained by the Content Indexer ensure that Windows Search can return results as quickly as possible.
There are a number of cases where the indexer can get in the way. Like when it decides to index while you are processing a large number of large images. Or, if you have just created a lot of large images by copying them from another machine or, by creating them in bulk from existing files, as F4W2HDU can. Though the Content Indexer should be able to determine that the machine is busy, in reality it does a pretty bad job at this by claiming excessive resources and slowing the system in the process.
Solution 2: Turn off the Content Indexer - It is likely that once the Indexer is shut down, you will experience a marked performance boost across Windows (see Note 2 below), as the Indexer tends to be running in the background when you most want the resources for your own use.
Note 2: There is a trade-off in doing this. Turning off the content indexer will result in slower searches. And some applications may pop-up a warning that the Indexer is off. I find it preferable to wait longer for searches than to have the machine slowed whenever the indexer decides to do it's thing. Which turns out to usually be when I need the system as responsive as possible.
Software Legitimacy - a word from your sponsor
There are already many torrent sites pretending to have FITS4Win2 available for download, after you pay a membership fee of course. I am reasonably certain at this point in time, that none of these sites have an actual copy of the software. They have merely skimmed publicly available information from Astroshed.com and presented it to look legitimate on their site.
FITS4Win2 is only available from Astroshed.com. If you find links to commercial Astroshed software that don't link back to Astroshed.com, then you should consider them suspect.
All free Astroshed titles released since 1995 are still available for free download from astroshed.com so there is no need to download them from anywhere else. If you do choose to try your luck with other sites, it is likely that you will be unpleasantly surprised with the outcome.
Purchasing the software legitimately, from me and downloading it from astroshed.com gets you a very useful suite of software at a reasonable price, with free support and free upgrades for the life of the major version, which is likely to be many years. Since 1995, commercial Astroshed software titles have averaged a 7 year useful life, before being overtaken by technology and requiring a major version update.
My intention is always to create long-term software without ongoing costs to the user. Just an initial outlay to offset my development costs and sacrificed family time. I consider that reasonable.